How to Flick a Coin with Your Fingers for a Perfect Toss?
Learning how to flick a coin with your fingers is an impressive skill that combines finger dexterity, proper technique, and practice. This comprehensive guide teaches you the exact finger positioning, coin shooting methods, and snap techniques needed to propel coins across distances with precision.
Whether you want to master coin flicking for entertainment, develop finger coordination, or learn this classic party trick, you’ll discover step-by-step instructions, troubleshooting tips, and advanced techniques that transform beginners into skilled coin shooters.
Understanding the Science Behind Coin Flicking
Coin flicking relies on the physics of momentum transfer and finger mechanics. When you flick a coin with your fingers, you’re essentially creating a small catapult system using your thumb and middle finger. The technique involves building tension between your fingers and then releasing that stored energy to propel the coin forward.
The key to successful coin shooting lies in understanding the relationship between finger pressure, coin placement, and release timing. Your middle finger acts as a launching platform, while your thumb provides the initial force. The snap motion creates the rapid acceleration needed to send the coin flying across the room.
Professional coin flickers often describe the sensation as similar to snapping your fingers, but with a coin positioned strategically between them. This comparison helps beginners understand the motion, though the actual technique requires more precision and control than a simple finger snap.
Essential Finger Positioning for Coin Flicking
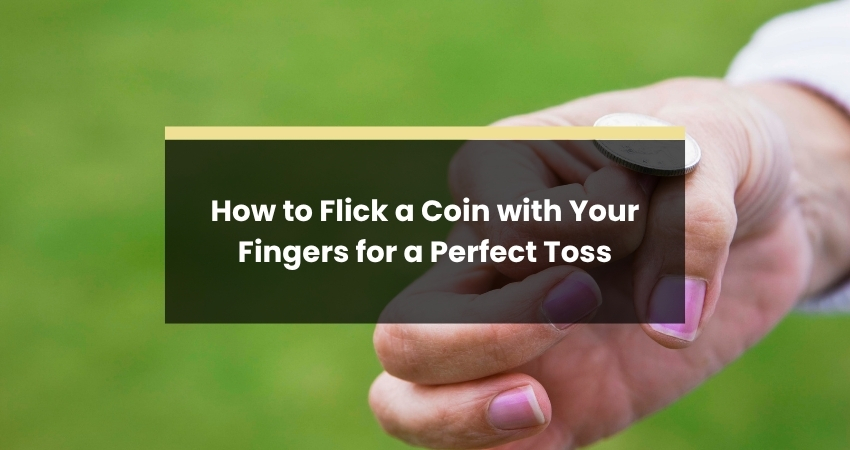
Proper finger positioning forms the foundation of effective coin flicking technique. Start by placing the coin on your middle finger, approximately halfway between your fingertip and first knuckle. The coin should rest almost in the center of your middle finger, creating a stable platform for the flicking motion.
Your thumb placement is equally crucial for successful coin shooting. Position your thumb on top of the coin while ensuring your middle finger remains visible beneath it. This creates the necessary gap for the coin to accelerate when you execute the snapping motion.
The angle of your hand affects the coin’s trajectory significantly. Hold your hand with your palm facing slightly downward, creating a natural launching angle. Your wrist should be straight but relaxed, allowing for smooth finger movement without restricting the coin’s path.
Practice maintaining consistent finger positioning before attempting to flick the coin. Many beginners struggle because they change their hand position between practice attempts, making it difficult to develop muscle memory for the technique.
Step-by-Step Coin Shooting Technique
Mastering coin flicking requires breaking down the technique into manageable steps that build upon each other. This systematic approach ensures you develop proper form from the beginning and avoid common mistakes that can hinder your progress.
Step 1: Initial Setup and Coin Placement
Begin by selecting an appropriate practice coin, preferably a penny or quarter for optimal weight and size. Hold your dominant hand in a comfortable position with your palm facing slightly downward.
Place the coin on your middle finger, positioning it approximately halfway between your fingertip and first knuckle. The coin should rest securely but not be pressed too firmly against your finger, allowing for smooth movement during the flicking motion.
Step 2: Thumb Positioning and Tension Building
Position your thumb on top of the coin while ensuring your middle finger remains steady beneath it. Create a small gap between your thumb and the coin’s surface, then gradually apply downward pressure.
This builds the tension necessary for propulsion while maintaining control over the coin’s position. Your thumb should cover roughly half of the coin’s surface, providing adequate contact area for effective force transfer.
Step 3: The Flicking Motion and Release
Execute the flicking motion by rapidly snapping your thumb forward while maintaining steady middle finger support. The motion should be quick and decisive, similar to snapping your fingers but with more focused direction.
Release the coin at the peak of your thumb’s forward motion, allowing the built-up tension to transfer into forward momentum. The coin should shoot forward in a relatively straight line, creating a distinctive “whizzing” sound when executed properly.
Common Mistakes and Troubleshooting Tips
Even with proper instruction, new coin flickers encounter predictable challenges that can frustrate the learning process. Understanding these common issues and their solutions accelerates skill development and prevents the formation of bad habits.
- Coin Drops Straight Down: This typically occurs when the coin is positioned too far back on your middle finger. Move the coin forward toward your fingertip, ensuring it sits approximately halfway between your fingertip and first knuckle for optimal leverage.
- Coin Veers Left or Right: Uneven thumb pressure or improper release technique causes directional inconsistency. Focus on keeping your thumb motion straight and centered over the coin, practicing the snapping motion without a coin to develop consistent finger movement patterns.
- Insufficient Distance: Weak propulsion usually results from inadequate tension building before release. Create more pressure between your thumb and the coin while maintaining control, finding the balance between too much pressure (causing slippage) and too little (resulting in weak shots).
- Hand Fatigue During Practice: Normal muscle fatigue during learning is expected, especially when developing proper finger positioning. Take regular breaks to prevent strain and gradually increase practice duration as your finger strength and coordination improve.
- Inconsistent Results: Changing hand position between attempts makes it difficult to develop muscle memory. Maintain consistent finger positioning throughout practice sessions, focusing on technique repetition rather than immediate results.
Advanced Coin Flicking Techniques
Once you’ve achieved consistent basic coin shooting, exploring advanced techniques challenges your skills and demonstrates mastery of finger dexterity. These methods require excellent control and deep understanding of coin physics.
- Rapid-Fire Coin Shooting: Master shooting multiple coins in quick succession by developing smooth transitions between coin loading and shooting motions. Practice with three to five coins, focusing on maintaining consistent technique while increasing speed.
- Precision Target Shooting: Set up various targets at different distances and heights to develop accuracy and control. Start with large targets like cups or bowls, then progress to smaller objectives like bottle caps or specific marks on walls.
- Trick Shot Techniques: Incorporate creative elements like ricochets off walls, curve shots around obstacles, and bank shots to hit targets indirectly. These techniques require understanding coin trajectory and surface interaction physics.
- Distance Challenge Shooting: Attempt maximum distance shots by optimizing finger positioning and release timing. Practice in open spaces where coins can travel freely, gradually working toward greater distances while maintaining accuracy.
- Multi-Coin Sequences: Develop the ability to shoot different coins with varying techniques in planned sequences. This advanced skill demonstrates complete mastery of finger control and timing coordination.
Safety Considerations and Practice Guidelines
Responsible coin flicking practice protects both people and property while creating an environment conducive to skill development. Understanding safety protocols prevents accidents and ensures enjoyable practice sessions.
- Choose Appropriate Practice Spaces: Select areas with adequate clearance for coins to travel without hitting fragile items or people. Outdoor spaces work excellently for distance training, while indoor practice should focus on controlled accuracy work.
- Eye Protection Priority: Never aim coins directly at people, pets, or faces, even during casual demonstrations. Experienced flickers can have unexpected misfires that send coins in unintended directions, making eye safety paramount.
- Clear Practice Zones: Remove breakable objects, electronics, and valuables from potential coin trajectories before beginning practice sessions. Even controlled practice can result in surprising coin paths for beginners.
- Proper Coin Storage: Keep practice coins separate from regular currency to avoid accidentally spending damaged coins or losing dedicated practice pieces. Consider using coins specifically designated for training purposes.
- Group Practice Protocols: When practicing with others, establish clear shooting directions and wait for all clear signals before shooting. Coordinate practice sessions to prevent multiple people from shooting simultaneously in conflicting directions.
Building Finger Strength and Coordination
Developing the finger strength necessary for consistent coin flicking requires dedicated exercises beyond simple practice. Finger flexibility exercises help maintain the range of motion needed for effective thumb positioning and release technique.
Hand and finger stretches before practice sessions prevent cramping and improve overall performance. Focus on stretches that target your thumb, middle finger, and wrist areas. These same muscle groups power your coin flicking motion.
Grip strength exercises complement coin flicking practice by building the foundational strength needed for consistent pressure control. Simple exercises like squeezing stress balls or practicing finger snaps help develop the quick-twitch muscle responses required for effective coin shooting.
Progressive training involves gradually increasing practice duration and intensity as your finger coordination improves. Start with short practice sessions focused on technique rather than repetition count, then build endurance as your skills develop.
Coin Selection and Equipment Considerations
Different coins produce varying results in coin flicking applications. Pennies are often considered the perfect size for coin shooting, offering an ideal balance of weight and diameter for beginners. Their copper composition provides good grip and consistent performance.
Quarters offer advantages for longer-distance shooting due to their increased weight and momentum retention. However, their larger size can make initial learning more challenging for people with smaller hands. Nickels and dimes present their own unique characteristics that affect shooting performance.
Foreign coins can provide interesting variations for experienced flickers looking to expand their skills. Different weights, sizes, and surface textures create new challenges and help develop adaptable techniques. Always ensure coins are safe to use and legally obtained.
Consider creating a dedicated practice kit that includes various coin types, targets, and measuring tools. This systematic approach helps track progress and provides consistent training conditions. Some practitioners maintain practice logs to monitor improvement over time.
Conclusion
Mastering how to flick a coin with your fingers requires patience, practice, and proper technique. Start with correct finger positioning, focus on consistent thumb motion, and prioritize safety during practice sessions. With dedicated effort and the step-by-step methods outlined in this guide, anyone can develop impressive coin shooting accuracy and distance.